There are several reasons you will need to select and edit takeoff (covered in the articles that follow):
There are many ways of selecting and editing takeoff objects...
Selecting Takeoff Objects
Once drawn on a screen, you will often need to select an object or objects to:
To select takeoff, or a specific object (such as text or a highlight mark),
- Click the Select tool
 .
. - Click directly on the object - if there are multiple objects layered on top of each other, it may be necessary to click more than once to select the correct object - when a single object is selected, it displays the move/resize 'grab handles' on its edges.
- To select multiple objects, but not all surrounding objects, use the Select tool while holding down the <Shift> key, then click on the objects to select - when multiple objects are selected, they are highlighted in yellow.
Clicking an on object once selects it, clicking a second time de-selects it.
To select a Hot Link, you cannot click on it (because that activates the Hot Link). You must "rope" a Hot Link to select it. Luckily, we cover "roping" next.
Select by Roping
Roping means to draw a box around multiple takeoff objects to select them.
There are two types of roping:
- Inclusive Roping - only takeoff objects located completely within the region box are selected
- Touching Roping (default) - takeoff objects that are located within or touching the region box are selected
Set roping preference in Tools > Options > General (tab).
Example: Inclusive
When roping a region, takeoff objects and annotation must be completely within the 'roped' box
In the image on the left, notice the roping (the pink outline). In the image on the right, you can see the results of drawing the box - only items entirely included in the roped area (three walls and two doors) are highlighted in yellow indicating they are selected. Notice that other walls in teal and the light yellow area are not included (they were touching the rope, not fully inside it).
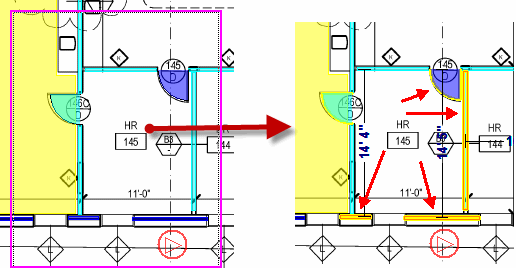
Roped Area Inclusive Selection
Example: Touching
When roping a region, takeoff objects within the box or merely touching the rope box are selected.
In the image on the left, notice the roping (the pink outline) is the same as the box above, however the image on the right shows objects included in the roped area as well as those intersected by the rope are now highlighted in yellow indicating they are selected.
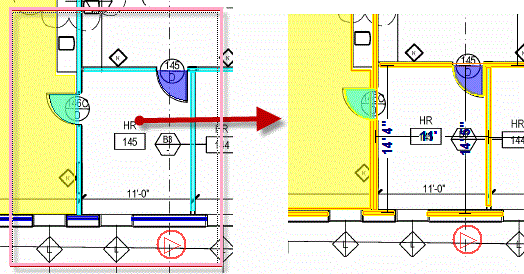
Roped Area Touching Selection
To rope multiple objects, hold down the <Shift> button and click the Select tool , then click and drag around the groups of objects to select.
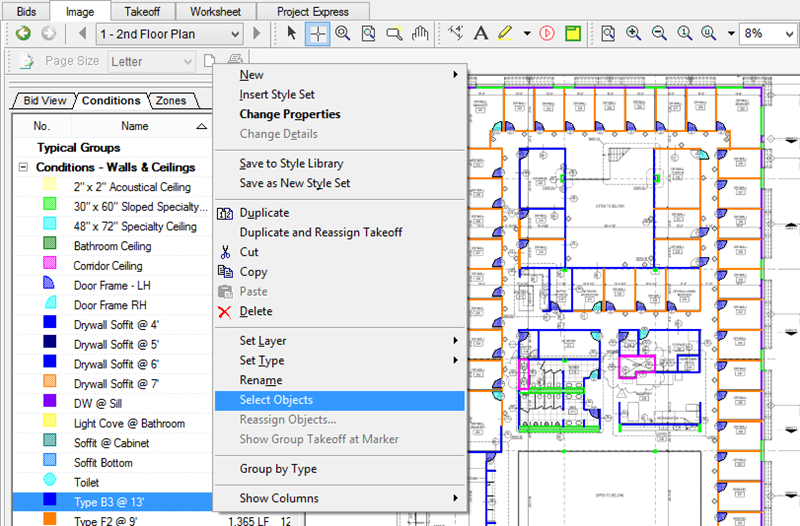
Select All Takeoff for a Specific Condition
To select all takeoff on the current page for one or more specific Conditions,
- Right-click on the Condition in the Conditions window.
- Click Select Objects in the context menu.
You can select all the takeoff for multiple Conditions,
- Hold down the Ctrl (contiguous) or Shift (not contiguous) key.
- Click on each Condition you want to select.
- Right-click and choose "Select Objects" from the context menu.
All takeoff objects on the current page for the selected Condition(s) are selected (highlighted in yellow).
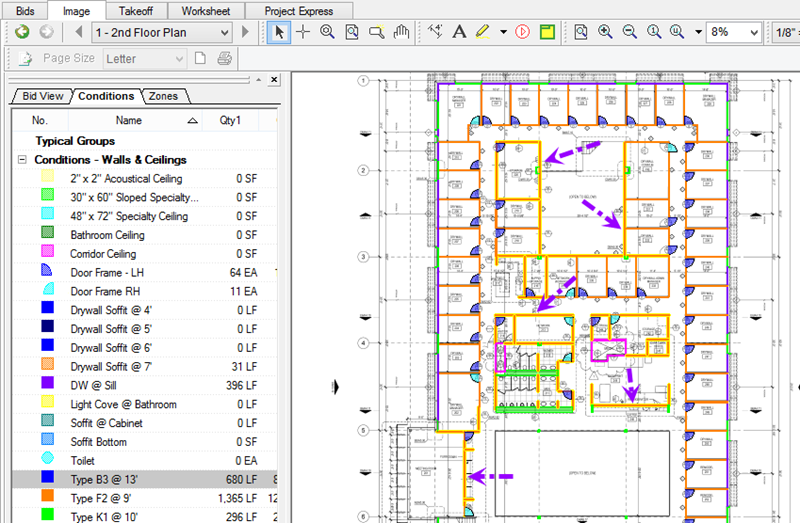
Only objects on the current page are selected - other pages in the
project are unaffected.
Select All Takeoff Objects on the Current Page
If you want to select all the takeoff on the current Page,
- Click within the Image Window (be sure not to click within the Condition Window)
- Press <CTRL> + A or click Edit > Select All
All takeoff objects on the current page are selected (they will all have a yellow highlight around them).
Use the Copy/Cut/Delete buttons or keyboard shortcuts to perform editing functions.
Be mindful of where your cursor is positioned when you select all. If your focus is on the Conditions Window when you "Select All", you are selected all your Conditions - if you click or press Delete, you would delete all Conditions and every piece of takeoff in your Bid.
Deleting a Condition (or Conditions) cannot be undone - the Condition and all takeoff drawn with it in this bid is lost forever!
You are prompted to confirm your actions anytime you try to delete a Condition.
Deleting Takeoff and Annotation Objects
When you have one or more objects selected on a Page, you can hit the delete button  on the main toolbar, <Delete> (or <DEL>) on your keyboard, or right-click and select "Delete" to delete the objects. If you change your mind, you can immediately hit the Undo button
  to restore the deleted objects.
To delete all
takeoff objects for one or more Conditions throughout a Bid, you can delete the
Condition(s) itself. Deleting a
Condition immediately and irrevocably deletes the
Condition and all associated
takeoff (you are prompted to confirm because deleting a
Condition cannot be
undone...). This is not recommended because you could (likely) be deleting
takeoff from Pages you are not looking at.


 How Bid Areas and Layers Affect the Image Legend