
5.04.03 Item Detail - Sizing Tab
![]() Item Detail - Sizing tab video
Item Detail - Sizing tab video
The purpose of entering an Item in the Condition Detail is to generate a quantity for a specific Material or Labor activity based on the settings found at the Calculation tab. The settings on the Sizing tab allows Quick Bid to convert those quantities into usable values or standard containers.
For example,
Let's start with a Wall. The quantity is probably a LF (when you look at the blueprints, you measured the wall from a birds-eye view) and the Height of that wall is 8'. We'll say your wall length is 10', just to make things easy.
Now, let's say you want to quantify the cost associated with applying paint to that wall. The Condition Quantity is LF (or meters) but you wouldn't valuate painting by the LF - you'd valuate it by SF (or m2) because paint is applied to the surface. So, your Line Item is set up to use the Condition Qty (10 LF) and the HEIGHT (8') to calculate SF and comes up with 80 SF (we'll just assume there is no waste, OK?).
But wait! You can't order PAINT by the SF - you need to convert the SF into a USABLE container you can order from your Supplier (gallons or cans). Using the settings on the Sizing tab, Quick Bid converts the calculated paint quantity (SF) into Containers such as a quart, gallon, 5 gallon, etc. Likewise, when pricing metal or wood studs, the Condition holds a linear footage measurement, although studs are normally purchased by the bundle or piece - the Sizing Tab tells Quick Bid how to convert the Item quantity to something you and your supplier can work with.
The Sizing tab displays three controls that describe specific characteristics of the Item. The Sizing tab also provides information about how the Items are typically sold/obtained (such as Size Method, Container, and Mixture Yield). You will also enter default settings such as size, color, thickness, material combinations (Mixture), container quantity, and container descriptions on the Sizing tab.
The grid at the bottom of the dialog box is where the estimator defines different Sizes or Styles or Mixture components.
The Size Method drop down provides options for describing the physical attributes of Material or Labor Items and defines the container by which the product is usually purchased. The drop down menu presents five options that describe these physical characteristics – Sizes, Styles, Styles with Sizes, No Sizes, and Mixture. The UOM of the Item record (upper right corner) controls which options will be available.
Most UOMs (except for EA, volume UOMs such as CF, or m3) create a grid in the lower section of the dialog box with multiple columns for size, units in a container, container definitions and weight.
Styles and Styles with Sizes are explained in detail in the next article.
Field |
Description |
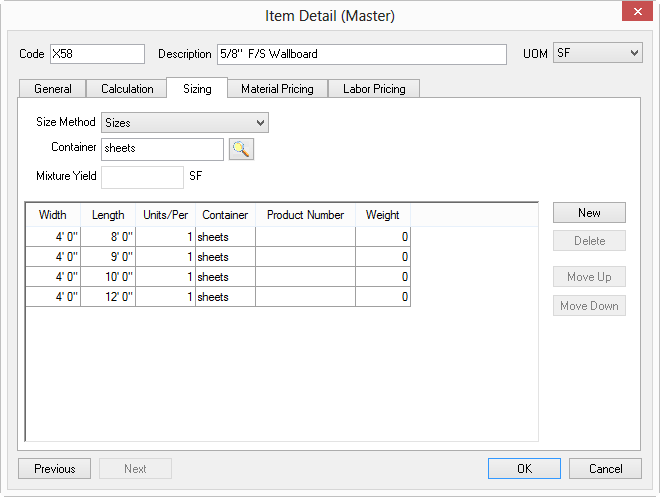
Sizes
|
Use this option to setup the most common sizes available for this Item. To add additional sizes, use the NEW button.
The Units/Per column determines the pieces or coverage rate in a container. For example, 10 units/bundle, 10,000 units/box, 1 unit/ each, or 350 units/gallon. The container name is selected from the drop down menu. The Units/Per only converts the material quantity calculated into the number of containers required.
|
Styles |
Sizing a Material by Style works well for Materials that have a single size but come in a variety of grades, colors, or finishes or where the size of the Item does not affect the Quantity (such as a 4" diameter door knob vs. a 3" diameter door knob). Each Style may be assigned a different price but not necessarily.
A Style can be a material characteristic, a labor activity, or even a catalog number. Examples include door slabs or frame sizes, color, paint sheen; labor application variables; different grades or weights of carpet or wall covering; metal or Vinyl Trim items; hardware groups with catalogue numbers and so on. Each style may default to a different material price or labor value.
Labor variables can be set up as Styles. For example, labor to paint a concrete block may be set as a Style which could list different methods of application - Brush, Roll or Spray. Another approach would be labor assigned to different concrete forms – wood, steel pan, etc. Also, framing labor for different wall heights might be entered as Styles. Each height entry could then default to a different production rate or unit price.
When viewing material reports, “Styled” materials are listed with their description followed by the Style name.
The Units/Per column is based on the Item's UOM.
|
Styles with Sizes |
This method has the same default characteristics mentioned above except that size attributes may be assigned to each Style. Each option could be set to a different price. For example, an Acoustical tile may be available in 3 different sizes, each having 4 edge profiles - or you may build an door Item that has 4 different grades of wood, each a different size, where the size of the object DOES matter when it comes time to determine how much paint it takes to cover them..
When a “Styled” Item is added to a Condition Detail, Quick Bid auto-selects the first entry listed in the Style column of the Item Detail. The style name is displayed under the SIZE column of the Condition Detail and the field is flagged in blue to indicate the Item is available in more than one size or style. The labor fields in the Condition's Item Detail display production in quantity, pieces or time.
|
No Sizes |
Some Items have no particular size attributes or the size is irrelevant to determining how much of an Item to order. For instance, a drywall screw named DS114 means a 1.25 inch screw - the name itself indicates the size but that size has no relevance to the number of drywall screws you need.
The Units/Per column is assumed to be LF or millimeters. |
Mixture |
Mixtures allow you to enter specific material quantities for a combination of materials required for a given coverage or yield. Mixtures also allow you to combine a group of Material Items into a single line entry in a Condition Detail where Labor will apply to the mixture.
For example, our Item Code TF1 (Fire Tape Level 1) is a mixture of two other material Items: Tape-250 and Mud4. These materials are listed below the Yield of 1,000SF.
An advantage of a Mixture is that it allows you to manipulate the original UOM of a material by entering that material into a mixture containing a different UOM. For instance, an anchor or clip would have EA as their UOM. If you wanted a specific number of anchors or clips based upon the LF of an object (beam, wall, etc.), a record that calculates by the LF could be built as a Mixture specifying the exact number of “EA” Items required for a given linear yield.
|
Allows you to choose a description that represents what unit the item is priced by. For example, a Container for drywall is usually a sheet while a Container for screws would be a box - however an item is logically ordered/purchased. See Master Tables - Containers for more information on specifying Container names.
If you are setting up a Mixture and previously set the Material Pricing tab "Price Per" to something OTHER THAN '1', you need to return to the Material Pricing tab BEFORE setting the Size Method to "Mixture", set the "Price Per" to '1', then return to the Sizing tab and select "Mixture". This only happens if you adjust the Material Pricing "Price Per" BEFORE setting the Item to "Mixture" - which rarely happens.
Setting up a Mixture requires specifying the Yield (some much of "X" and "Y" covers so much of "Z").
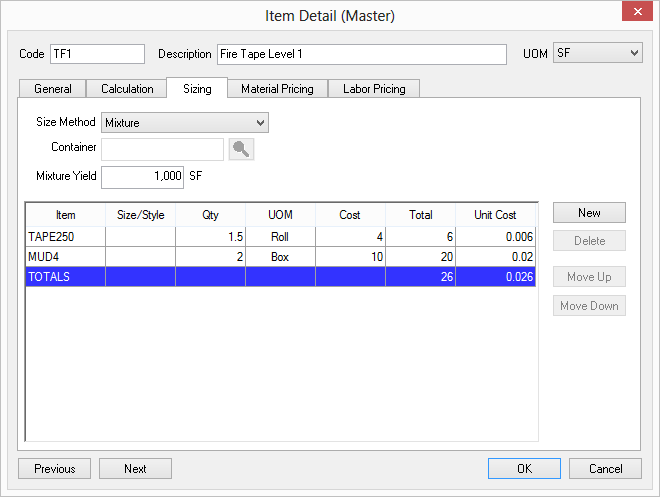
Example of a common Mixture, TF1 (Fire Tape Level 1)
When Mixture is selected at the Size Method field, a grid appears along with the Yield field.
Next, add Items to the Mixture Grid to define what Materials and how much of each sub-Item is required to provide a single "Yield". In the example above, 1.5 rolls of tape and 2 boxes of mud provide 1000 SF of coverage.
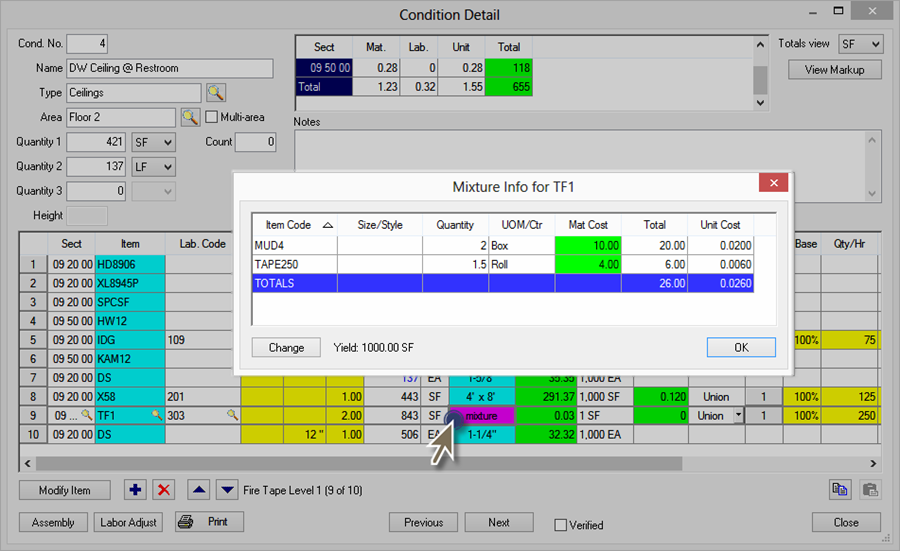
When a Mixture Item is used in a Condition, the Size box turns into a pink Mixture button, click this button to open the Mixture Info dialog box where the sizing (UOM) and pricing information is displayed.
The Mixture setup cannot be changed, with the exception of Material Cost. to change component Item(s), Labor pricing or production information, each Component Item must be edited by editing the Bid Level (on the Material or Labor Tabs) or Master Item (for future bids).
©2015 On Center Software, Inc. All Rights Reserved.
 Send Feedback About This Page